How To Master Tracks for ACX in Audacity

Affiliate Link
One of the simplest, and yet most frustrating parts of learning how to produce audiobooks was figuring out how to master the tracks to meet ACX requirements in Audacity. Once I got everything dialed in, everything got much easier on that front.
Here’s how to do it, and some other tricks I have figured out that make the process go even faster.
Why is making this step faster important? Simply put: time is money. The more time I spend recording and producing an audiobook, the fewer audiobook projects I can tackle, which means less revenue for me. Every minute I can save myself means more time to work on other audiobook projects, and when you do 15-20 audiobooks a year, as I have done in the past, those minutes can really add up.
Before we start: the steps below are presupposing that you have already completed proofing and your QA (you’ve said all of the correct words in the right order, and removed your clicks/mouth noises/extraneous sounds). Mastering is the final step, so if you haven’t done your proofing and QA, do that now.
1) Download and install Audacity and RMS Normalize
If you haven’t done so already, download and install Audacity. Download Audacity here.
You will also need the RMS Normalize plugin, which does not come with the Audacity download. Download the RMS Normalize Plugin here.
2) Set up your parameters
You’ll need to run three filters to master the tracks for ACX: Graphic EQ, RMS Normalize, and Limiter. Each has its own parameters that need to be set, and if they aren’t set correctly, they can either dramatically reduce the overall quality of your audio, or make your tracks fail to meet ACX tech specs.
Graphic EQ
Open the Graphic EQ window, choose “Manage”, go to “Factory Presets, and choose “Low rolloff for speech”. Then click OK.

Settings for your Graphics EQ
RMS Normalize
Set your Target RMS Level to -20.00. Normalize Stereo Channels to “Independently”. Click OK.

RMS Normalize Settings
Limiter
Type: Soft Limit
Input Gain (dB) mono/Left and Right: 0.00
Limit to (dB): -3.50
Hold (ms): 10.00
Apply Make-up Gain: no

Limiter Settings
There is one more set of parameters to set that will come into play, and that is for the Noise Reduction filter. Open that filter, set Noise Reduction (dB) to 12, Sensitivity to 6.00, and Frequency Smoothing (bands) to 3. Make sure that the “Reduce” radio button is selected.
3) Build your macros
You don’t have to do this step; you could simply apply those filters in the order given above (the order is important) and master your tracks to meet ACX standards. However, I’ve always found the process tedious, and by taking a few more, very simple steps, you can save yourself a lot of clicking and time.
What is a macro?
A macros is a series of steps that you prerecord, and when you trigger it, the steps play out in the order in which they are told to. It’s a way of executing repetitive steps automatically.
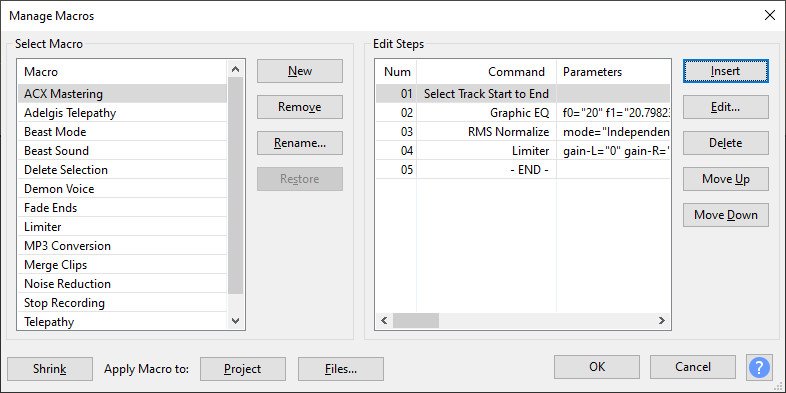
Create Macros Window
How to build a macro in ACX
Go to Tools, then Macros.
Click on “New” and call it something. I called mine “ACX Mastering”.
On the right hand side, click on Insert. This will open a window with all of the functions in ACX.
Find “Select track start to end”, and then click OK. This will add that function to the macro..
Now find “Graphic EQ” and click on it and then click OK.
Now do the same for RMS Normalize and for Limiter. Again, it’s important that the filters are executed in this order. If you apply the filters in a different order, the tracks will not meet ACX requirements.
But wait, we’re not done! There are two more macros you’ll want to set up.:
Set up a new macro that uses the Noise Reduction filter, and set up a third macro that uses the Join function. Both should start with “Select track from start to end”, otherwise they won’t work.
OK, now we can move on to the next step.
Affiliate Link
4) Set up keyboard shortcuts
Again, you don’t have to do this step. You could just apply these macros “manually” by choosing them from the Apply Macro menu. I find that the keyboard shortcuts make it so much easier.

Keyboard Shortcuts Window
Go to “Edit” and select “Preferences”. On the left-hand side, select “Keyboard”. This will show you all of the functions in Audacity, and what keyboard shortcuts are already in use.
Search one of your macros by whatever name you gave it, and select it. The input area beneath the display area will now be active. If you click in that space, any keyboard buttons you press will show up there. For instance, if you press the Ctrl and Shift and M keys at the same time, “Ctrl + Shift + M” will show up in that area. (That is what I use for my ACX Mastering shortcut). Click “Set”, and now that macro will be mapped to those keys. So when I press Ctrl Shift M, my ACX Mastering macro runs.
Do this for your mastering macro, the noise reduction macro, and the join macro that you made.
5) Master the tracks
Finally! Select the track you want to master.
Start by running your Join macro. This eliminates all of the clip marks in the track and makes it one, unified track.
Now run your ACX Mastering macro. The tracks will change dramatically.
The final step is to give it a quick polish by running some light noise reduction. Select a piece of clean room tone (no extraneous sounds or vocalizations). Open the Noise Reduction window from the Effects menu and choose “Get Noise Profile”. This will tell the filter what it needs to “listen” for and reduce. The window will automatically close.
Now run your noise reduction macro. This will help even out some of the “ups” and “downs” that can occur during the editing process and will make for a better listening experience for the end user without degrading your audio quality.
6) Final touches
The beginning and end of each track requires about 1.5 seconds of silence. Even a little mouth click in those windows can cause the track to fail inspection. What I do is trim the beginning and end to the approximate length (it doesn’t need to be exact, just in the neighborhood), and then I’ll use “Edit>Remove Special">Silence Audio” (or keyboard shortcut F5) to silence the beginning and end.
7) Export the tracks
Tracks need to be MP3s, using the “Constant” Bit Rate Mode, with Quality set to 192 kbps.
…and we’re done! Your tracks are ready to upload.
But wait…the track still failed!
This happens to me sometimes, and I mean like 1 out of 100 uploads. The first thing I do is re-upload the track. Sometimes ACX “hiccups” and kicks back a track as having a problem, but when I re-upload it, the problem goes away. There are rare times, however, where that doesn’t fix it…in which case, I simply run the ACX macro one more time on the already-mastered track and re-upload it.
If that doesn’t fix it, you probably have a deeper issue with the audio; make sure that your raw sound quality is where it needs to be, and that you have the ENTIRE track mastered (I’ve run into this when I’ve occasionally done multi-track recording when vocal effects have been needed).
Brian Wiggins is a SOVAS Voice Arts Award-nominated voice actor with over 60 audiobook credits to his name, as well as commercial credits.